Relief Print Processes
Wood engraving and Woodcut
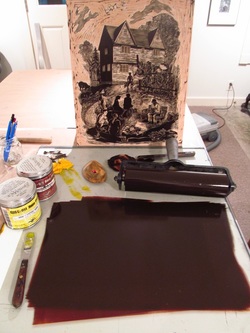
The difference between the two are the type of wood used and the tools. The photo below at the very end shows the completed woodcut on a Shina wood block with Japanese woodcut tools.
Steps one through three are photos of the process for wood engraving. These same basic steps are used for both wood engraving and woodcut. Wood engraving is done on the endgrain of hard woods like boxwood, maple and some fruit woods (cherry or pear). Density (due to slow growth) makes a wood suitable for engraving and makes it possible to cut fine detail. Cutting on the endgrain allows a fluidity not present in wood cut which is done on the plank side of the wood with wood gouges. As quality wood is scarce, Resingrave is a modern substitute.
Each wood engraving in my portfolio has taken many hours to engrave. For example, a 6”x 8” block represents 40 to 50 hours of work. Once the block is near completion I proof it with ink and then fine tune the image until it is complete. Then the printing of the edition begins. The last step is curating the edition by numbering and signing each print, making sure that each is to the standard set by the first print.
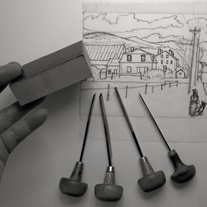
Step 1 Drawing the image on tracing paper.
Many times I have a subject in mind that I may have recorded, from life, in my sketchbook or journal. I scale this original drawing up or down depending on the size of the wood block and redraw it on tracing paper. This allows me to turn it over and transfer it to the block in reverse. The image will again reverse itself in the printing. Blackening the block with a thin coating of India ink or printing ink helps see every cut.
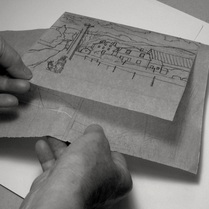
Step 2 Transfer the drawing to the block.
Tape the tracing paper drawing to the block and slip a piece of Saral transfer paper underneath. Then retrace the drawing with a fine sharp pencil. I like to use blue Saral, but it’s also available in other colors. The resulting blue line is visible but not distracting. Next spray lightly with pastel fixative to keep the drawing form smudging when you are cutting the block.
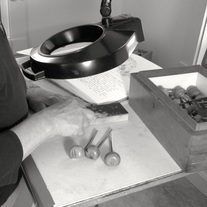
Step 3 Begin cutting the block.
I start by deciding which areas will be the darkest and which the lightest. The middle values will be important too, and all three should be in balance with each other. I begin by cutting the darkest areas and then the middle values. Wood engraving is a slow thoughtful process because errors are difficult to fix!
Printing the block. While the wood engravings are best printed on a letterpress like the Vandercook proof press, wood cuts can be printed by hand.
Papers. I have use Zerkell Book for the wood engravings for decades. Sadly the mill was damaged by floods and shut down. For the woodcuts I use Japanese papers.